GRINDING
NAILS
By Kathryn Holmes
I use a Dremel
Moto Tool so I am familiar with these; there are other types of grinders,
which may work just fine. Use the drum style attachment with coarse
grit sandpaper. The fine grit takes longer & therefore heats up faster.
Start by
getting your dog used to the tool. With the dog on your lap, hold
the Dremel (turned off) away from the dog & gradually bring it closer. Rub
the Dremel on the dog’s body until it gets comfortable with having
it close. Do this over the course
of a few days if necessary. Then, turn the Dremel on, again
holding it away from the dog. Gradually bring it closer until the
IG relaxes &
gets comfortable with the noise & vibration, you can rub it on yourself
to show the dog that you believe it is safe. Do this over the course
of a few days (if necessary) also with praise and treats.
Another tip for introducing the Dremel is to let the dog watch
your other, experienced dogs having their nails done. To help puppies
get used to the idea when they’re VERY young, I do the older dog’s
nails in front of the puppy pen. This
really helps the acceptance process too.
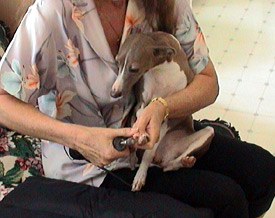
Once the dog
is used to the tool, you’re ready to begin grinding. Hold the
dog in your lap with it's back against your body.
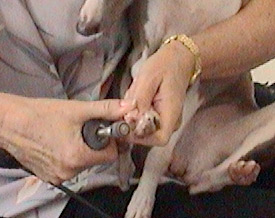
Brace the hand holding the Dremel on the hand holding the
paw so that if the dog moves its paw, both hands & paw move as a unit.
This will prevent either the dog or you from getting burnt by the Dremel.
I grip the Dremel with my hand, thumb extended, & use that thumb
to brace onto the thumb of my paw holding hand.
The first
few times don’t grind much just touch the nail and let the dog feel
the vibration. Go slow with lots of happy praise and treats. Touch
a nail; praise and treat, then do another. Gradually stretch the time
between treats to after you finish each foot and then to when you have finished
their nails. Each dog is an individual; the timing and praise will
need to be adjusted by knowing its temperament.
Heat is the
big challenge, so the goal is to keep the actual grinding time very short.
Quickly zip (one second) one side of each nail, come back & zip the
other side, then go on to the next foot. This brings the nails to a point.
The center is where the soft pulp and then quick (the sensitive part
which will bleed) are. Stop when you see the pulp, it will wear down
by itself. If you are doing long nails, repeat (starting from the
first foot) until they are short or you reach the pulp. Nails where
the quick has been allowed to get too long should be done every other day.
Your dogs will stay more cooperative if you do it more often & not try
to do too much at one sitting. If you get close to the quick every
day or every other day it will begin to recede.
Just doing
the sides of the nails will sometimes leave a sharp hook. These will
need to be filed at the bottom where they turn under. Just zip along
the bottom or you will get scratched when you dog put its paws on your bare
skin.
Do nails when
you have plenty of time and can go gently but firmly. A good attitude
is, “It’s OK, I am not going to hurt you but we will just keep
at it until we are finished.” If your dog’s struggling or
complaining causes you to quit, his resolve will strengthen & he’ll
be even more resistant next time. Plan to do one foot a day, if he’s
very resistant, but do not give up or quit. Once you have shown that
you will be gentle but persistent your Iggie will give in quicker each time.
Some dogs
will struggle, even causing you to set the Dremel down (don’t forget
to turn it off!). Simply regain your grip, reposition the dog, & start
again. Stay calm & confident (tell him he’s being silly &
this is no big deal) & grip gently. Be careful not to hold the
leg so hard it hurts. Move with the leg rather than letting him pull free.
No matter how many times you have to reposition, stick with
it (calm, patient, PERSISTENT). He WILL give in eventually since your
persistence has shown him that it is inevitable. Once he gives in,
you’ve got him! That doesn’t mean he won’t struggle
again next time, but it will be shorter each time as long as you don’t
give up. This method works for brushing teeth too.
If I have
an especially difficult dog I will do a little every day until they are
used to it.. If I get a screamer, I scream
back. You’ll laugh at the look on their face when you do a high-pitched
scream right back at them. A few of my shrieks & they will stop.
Whatever you
do, resist the temptation to sympathize with him.
Sympathizing tells the dog he has reason to be afraid. Again,
you are not going to hurt it and the dog is being silly when it struggles.
That is your attitude if you want the dog to feel secure and that
this is a normal, safe part of grooming. Not “Poor iggie, it’s
OK” but “You’re so silly, I’m not going to hurt you.”